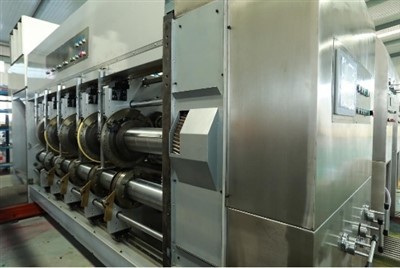


Model:1600x3600

Tech parameters
| Data/model | 900x2000 | 900x2400 | 1200x24000 | 1200x2800 | 1400x2400 | 1400x2800 | 1600x2800 | 1600x3200 | 1600x3600 |
| Max machine speed(pcs/min) | 300 | 300 | 250 | 220 | 220 | 200 | 200 | 180 | 120 |
| Max feeding size(mm) | 880x2000 | 880x2400 | 1180x2400 | 1180x2800 | 1380x2400 | 1380x2800 | 1570x2800 | 1570x3200 | 1570x3600 |
| Min feeding size(mm) | 280x660 | 280x660 | 320x680 | 320x680 | 360x680 | 360x680 | 420x710 | 420x710 | 420x710 |
| Skip feeding(mm) | 1100x2000 | 1100x2400 | 1500x2400 | 1500x2800 | 1700x2400 | 1700x2800 | 1900x2800 | 1900x3200 | 1900x3600 |
| Max printing area(mm) | 850x2000 | 850x2400 | 1150x2400 | 1150x2800 | 1350x2400 | 1350x2800 | 1540x2800 | 1540x3200 | 1540x3600 |
| Thickness of printing plate(mm) | 7.2 | 7.2 | 7.2 | 7.2 | 7.2 | 7.2 | 7.2 | 7.2 | 7.2 |
Installation of the die template for corrugated cardboard printer jumbo size
Installation of the Rubber Pad (see the video disc and instruction manual in the rubber pad installation toolbox)
Installation of the rubber pad is very simple. There is no need to disassemble the die-cutting roller; simply press the rubber pad strip into the groove on the die-cutting roller for corrugated cardboard printer jumbo size.
Install the rubber pads sequentially (using a special tool). After installation, during die-cutting, the rubber pad roller will rotate with the die-cutting roller to avoid repeated cutting at the same position on the rubber pad roller and to compensate for the speed error between the die-cutting roller and the rubber pad roller at the joint point. The rubber pad is made of synthetic rubber; a cutting depth of approximately 1mm is suitable during operation. The deeper the cut, the shorter the die-cutting life.
Rubber Pad Grinding for corrugated cardboard printer jumbo size.
The rubber pads of this machine are ground using sandpaper. Simply grind away the roughened parts on the surface of the rubber pad. The specific operating steps are:
1) Raise the rubber pad roller to its maximum position, i.e., the die-cutting gap is at its maximum.
2) Using the pressure adjusting three-pronged handle or a dedicated ratchet wrench, slowly press the sanding roller down, maintaining a 1mm gap with the rubber pad roller, and check its parallelism. If perfectly parallel, proceed to step 3). If not parallel, adjust the spring mechanisms on both sides to achieve parallelism.
3) Start the machine at a speed greater than 30P/min.
4) Start the grinding motor. Check if its rotation direction is consistent with the rubber pad's rotation direction. If consistent, reverse the motor wiring.
5) Slowly press the sanding roller down to contact the rubber roller and begin grinding. As time progresses, the gap between the two rollers needs to be adjusted.
6) Stop the machine to check the surface finish and flatness, and complete the grinding process. This generally takes about 30 minutes.
Prohibited Practices for for corrugated cardboard printer jumbo size.
It is strictly forbidden to begin grinding before changing the position of the rubber pad (see Figure 1 below). Doing so will result in a significant waste of the new rubber pad and, due to excessive contact pressure between the two rollers, will cause the sandpaper to become overloaded, bend, or detach. (See Figure 2 below). If the sandpaper detaches, it must be re-attached using type 101 A+B glue. Bottle A is a glass bottle, and bottle B is a plastic bottle. Mix well before use. Apply directly to the sanding roller with a brush. Before applying the glue, remove any residual glue from the sanding roller.
Hot Tags: corrugated cardboard printer, China corrugated cardboard printer manufacturers, suppliers, factory, corrugated sheet printing machine, Inline Flexo Printing, Inline Flexo Printing Machine, Corrugated Cardboard Printer, corrugated packaging machine, Flexo Rotary Die Cutter